Visit Captain Sim web site  
  Welcome, Guest. Please Login or Register


Page Index Toggle Pages: 1 Send TopicPrint
767: The Tutorial, A Work In Progress (Read 32272 times)
Tim Capps
Senior Member
*
Offline


Defense Lawyer & US Navy
JAG (ret), Writer

Posts: 1070
Location: Southern Illinois
Joined: May 21st, 2009
767: The Tutorial, A Work In Progress
Sep 6th, 2009 at 9:12am
Print Post  
NOTE: EVERYTHING THAT FOLLOWS IS A WORK IN PROGRESS AND SUBJECT TO SUGGESTIONS AND CORRECTIONS.

User Recommendation: Change Default Flight.  Default Cessna, everything OFF (except for master avionics, since some airplanes don't model that) with parking brake ON.  Field of your choice.  Save flight as default, replacing the hang glider in FSX.  Why?  FSX "expects" some parameters that are best met with a default flight.  Most add-ons will perform more reliably using this method.  NOTE: This will give you a "cold and dark" start for all your airplanes.  If you don't want to do this, then ignore this recommendation.

NOTE: The following looks complicated.  Just like the airplane.  But, like the airplane, it is not so bad once you learn how to focus on one area at a time.  Note how I have divided up the panel with light blue lines.  Key on the colors and numbers in the picture below, too.  Develop a "flow" so you can deal with items in a natural and logical procession.  These instructions will help you learn how to start your airplane.  It is no substitute for studying the manuals, which really are well-done.  Part III has an expanded checklist.

Everything may be accomplished from the virtual cockpit.  Generally, the green steps should be performed in order, followed by the red steps when you wish to start.

"Ignore" items should be checked, but should be defaulted correctly.  You do not want to be messing with the the electrical bus panel other than to turn External Power on or off.  There are "don't touch" items that can't be fixed by the pilot, like deploying the RAT, or passenger oxygen masks, or disengaging the generators from the engines.

However, please make sure your overhead does look like this when you are done: the identified items should be as indicated BELOW (even if you have to push a button I have otherwise assumed should be okay and marked with an X):


GOTCHAS! ---> For engines to start, you must have FUEL PUMPS ON, PACKS OFF, APU running with RUN LIGHT ON, sufficient bleed air pressure.  For IRS ALIGN TO STOP BLINKING you must be stationary and input your position as described in the FMC section below.

THE OVERHEAD
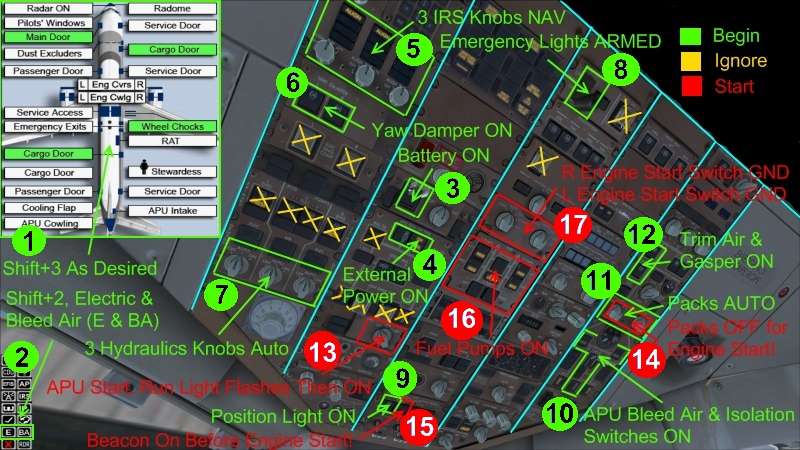


GREEN: Begin

1. Shift+3 for external animations as desired
2. Shift+2 for 2D icons, push E & BA for ground electric and bleed air (note, you can ignore this and start your APU once your battery is on, but this burns fuel and is less economical.)
3. Flip up battery cover & push ON
4. See "External Power Available" push ON
5. Turn 3 IRS knobs directly to NAV
6. Push Yaw Dampers ON
7. Turn 3 hydraulics knobs to AUTO
8. Open Cover, switch Emergency Lights to ARMED
9. Turn Position Lights ON
10. Push APU bleed air button On, push isolations switches ON, watch air pressure RISE
11. Turn Packs ON
12. Push Gasper and Trim Air ON, watch some lights go out

(Now program FMC, get clearance, etc.  Button up, pull chocks, get ready for pushback.)

RED: Start Engines during pushback

13. Turn APU knob to START, it will spring back, watch RUN light flash, then hold steady (if not, you have a big problem: call maintenance.  Also now Turn OFF external power and disconnect ground power and air -- your APU is running things.)
14. Turn Packs OFF, watch pressure rise on gauge below
15. Turn Red Beacon ON
16. Turn Fuel Pumps ON (even one that went out when APU started)
17. Start first the right engine, then the left, using the same procedure:
17(A). Turn R Engine Start Knob one click LEFT to GND
17(B). Watch R Engine indicators rise on upper EICAS (see below)
17(C). Flip UP R Fuel Lever below throttles, enjoy animation (see below)
17(D). Turn L Engine Start Knob one click LEFT to GND
17(E). Watch L Engine indicators rise on upper EICAS (see below)
17(F). Flip UP L Fuel Lever below throttles, enjoy animation (see below)

When both engines are running, you no longer need the APU.  Make sure both the R & L bleed air buttons on either side of the APU bleed air button are ON.  Turn APU OFF.  (You may do this during taxi, or even after takeoff, but the APU is burning fuel.)  Don't forget to turn your packs back on for your passengers' comfort.

PANEL AT TAKEOFF (although note red items from overhead discussion)
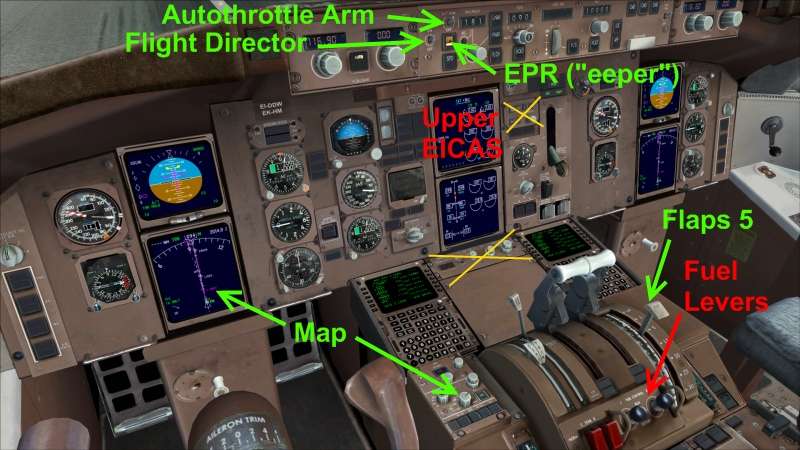


This shows where the Upper EICAS is and the fuel levers.

It also shows some other items related to takeoff.  Note that the thrust-related controls are crossed out because it is not necessary to do anything to them.  IF YOU WANT TO MAKE A DE-RATED TAKEOFF, you can set your assumed temperature on the FMC's Takeoff page.  (You can use these other controls, but is a different option.)

You want to make sure your Flight Director is turned on.  About the time your are turning onto the runway, arm your Autothrottle.  When you are ready for takeoff, simply advance your throttles to about 1.40 EPR and then hit the EPR button (for P&W engines, like the Delta has).  Autothrust will take it from there.

A note about TRIM:  if you feel you are zooming up at too great an angle, try setting your trim closer to 1 than 3.
  

PC: i9 10900K @ 3.8 GHz | 32GB DDR4 3200 | 10GB RTX 3080 | 32” Asus TUF VG32VQ Curved Monitor | Samsung 2TB SSD HD | Win 10 Pro 64 - Flight Sim P3Dv5.2 |
Back to top
 
IP Logged
 
Tim Capps
Senior Member
*
Offline


Defense Lawyer & US Navy
JAG (ret), Writer

Posts: 1070
Location: Southern Illinois
Joined: May 21st, 2009
Re: Tutorial -- Getting Started: The Overhead
Reply #1 - Sep 6th, 2009 at 10:44pm
Print Post  
Recommended 767 tools.

Freeware Fuel Planner (two choices, depending if you have NET.framework installed or not) :
http://www.nofuel.thatssailing.com/flightsimulator/fuelplannerb763/default.asp

Freeware De-rated Takeoff Calculator DTOCalc: http://mbev.net/lds767/ldsflyingclub/DTOCalc.zip

I also use the LROPS guide, which costs a little money, but is worth it in my opinion for realistic transatlantic flights.  You can read my review of it on AVSIM if you want: http://www.avsim.com/pages/0809/Book/LROPS.htm
  

PC: i9 10900K @ 3.8 GHz | 32GB DDR4 3200 | 10GB RTX 3080 | 32” Asus TUF VG32VQ Curved Monitor | Samsung 2TB SSD HD | Win 10 Pro 64 - Flight Sim P3Dv5.2 |
Back to top
 
IP Logged
 
Tim Capps
Senior Member
*
Offline


Defense Lawyer & US Navy
JAG (ret), Writer

Posts: 1070
Location: Southern Illinois
Joined: May 21st, 2009
Re: Tutorial -- Getting Started: The Overhead
Reply #2 - Sep 10th, 2009 at 11:04pm
Print Post  
I am currently experimenting with this formula:

197,000 lbs (operational empty weight) +
41,000 lbs (full load from ACE) +
  5,000 lbs (minimum landing fuel) +
FSX calculated fuel in nav log for trip +
35% (or 40% with headwinds) of FSX calculated fuel = Fuel Load

You can also try the FSX recommendation + 30,000 lbs as a rough and ready estimate.

The important thing is FSX will NOT give you a sufficient amount.  The question then become show much more do you need to make the trip safely and legally?

The problem with more "realistic" planning taking into account winds aloft and weights, etc.  is that I am not convinced that the effort pays off given the vagaries of FSX weather, even with add-on weather programs.  So try what you like, but I'll continue to experiment to find the easiest method.

The following shows you how to plan a realistic(ish) flight from Bahrain to London (OBBI-EGLL).

1. Find your real flight online.  You can use any one of number of flight information sources such as amadeus  (http://www.amadeus.net/) or the carrier's website.  For this one I used http://www.gulfair.com/bh/index.asp and found Gulf Air 005, departing at 1545 and arriving at 2100 for a total of 7 hours 15 minutes.

2. Load FSX.

3. Go to flight planner. Set up your departure and arrival airports and let FSX pick out your High Altitude IFR route.  Most of the time it will give you something pretty decent, but make sure.  Be sure to reset your altitude to something legal and reasonable.  (If you fly Aeroflot or Delta transatlantic routes in or out of Moscow, it may either refuse to work or route you in the wrong direction, so pick out your own routes on the map, point by point, along airways to the NAT.  It isn't as bad as it sounds once you get the hang of it, and you can save it as both an FSX flight and a company route.)

4.  If you want to use a Standard Instrument Departure (SID) and Standard Terminal Arrival Route (STAR) you will want to pay attention to where your SID ends and your STAR begins.  You can find charts online for nearly any airport and compare them with your route.  Your FMC has many such procedures.  Do not be surprised if your FMC and what you find online, or even in the FSX navigation database don't match 100%.  Depending on the date of creation, these things change (and FSX is frozen in time).  I'll have more about SIDs and STARs later.

For now, if you want to try them, just know that you will want the first fix on your route to be relatively close and in the same general direction of flight as the last fix of your SID.  If you can use the actual transition, great.  That is what is intended for: transitioning you from your procedure to your route.  The same goes for your STAR.  You will want the last fix of your route to feed naturally into your STAR.  For example, if you are coming into Moscow from the west, you will not want a STAR that starts way over somewhere to the east.

If your navigation database used by the FMC has procedures for an airport, you can find them on the Departure and Arrival page.  Pick the appropriate runway and transitions.  (Again this is just general.  I'll have something in detail later.)
  

PC: i9 10900K @ 3.8 GHz | 32GB DDR4 3200 | 10GB RTX 3080 | 32” Asus TUF VG32VQ Curved Monitor | Samsung 2TB SSD HD | Win 10 Pro 64 - Flight Sim P3Dv5.2 |
Back to top
 
IP Logged
 
Tim Capps
Senior Member
*
Offline


Defense Lawyer & US Navy
JAG (ret), Writer

Posts: 1070
Location: Southern Illinois
Joined: May 21st, 2009
Re: Tutorial -- Getting Started: The Overhead
Reply #3 - Sep 11th, 2009 at 11:53pm
Print Post  
I'll keep plugging along, bit by bit.  This afternoon I want to start on the FMC.  Captain Sim has made a thing of beauty here, and it is capable of amazing things.  But you have to start somewhere.

You can use it directly in the vc, but I far prefer to hit Shift+7 and drag the borders of the 2D pop-up to monumental size for my tired old eyes.

I start with the FMC shortly after the "Begin" (green) steps are finished on the overhead as I have shown above.  Unless you just want to do touch and goes or fly aimlessly, do not think about going anywhere without spending some quality time with the FMC.

The first screen will tell you some nice-to-know / realistic information that is not essential for basic FMC programming for now, so just skip to the POSIT INIT page.


The first thing you'll need to do is tell the airplane's brain where it is.  It remembers, but wants a human being to confirm.  By pushing the topmost line select key (LSK) on the right (LSK-1R from now on) you will copy the coordinates into the "scratchpad" at the bottom of the screen.  (This works for pretty much any data, by the way, and is something you'll do a lot of.)

You will see some empty boxes on the line next to the fifth button on the right.  Any time you see this, the FMC is requiring some information.  As you have already "copied" using the top button, you can "paste" whatever is in the scratchpad into a line by pushing the appropriate button.  (LSK-5R, or fifth button down on the right side).

SEE BELOW


You'll notice the ROUTE> at the bottom.  If you push LSK-6R, you will be taken to the page where you can begin entering your route.  The FMC is pretty smart about leading you to the next step.  Go ahead and push it.


Let's do things the easy way, which is also the realistic way, since airlines have their company routes pre-programmed.  Push LSK-3L to see available routes.  Don't worry about anything else at this point.


The next screen will let you choose a company route or get right into your FSX flightplans.  This is a very nice feature that Captain Sim has made very intuitive.  What's the difference between the two?

Your company routes are ones you have saved as such after they are already all programmed into your FMC.  Until you have done this, you will not have any company routes.  Here, you can see I have one: what looks something like "Cat-Louie-Joe" is really my code for an Atlanta to Moscow route: KATL to UUEE, which are the ICAO designators for Atlanta Hartsfield airport and Moscow's Sheremetyevo.  "J01" is just a further tag in case I ever want save other KATL-UUEE routes.

FLTSIM FPLS are your normal flight plans.  If you push LSK-6R you will get page after page of them.  Simply select one by pushing the button next to it and it will load all the fixes into the FMC where you can examine them.  (HINT: get into the habit of saving your flightplans in shorthand, rather than the default long names.)

Believe it or not, programming your route can be that simple (almost).  Next time we'll look at the LEGS page and go to the disco.  (Or at least learn about discontinuities and what to do with them.)  You'll also want to learn about how to set up your departure and arrivals (a little more complicated) and a different way of entering your route if you don't want to load a pre-saved one.  (Why would you want to do that?  I'll tell you that, too.)
  

PC: i9 10900K @ 3.8 GHz | 32GB DDR4 3200 | 10GB RTX 3080 | 32” Asus TUF VG32VQ Curved Monitor | Samsung 2TB SSD HD | Win 10 Pro 64 - Flight Sim P3Dv5.2 |
Back to top
 
IP Logged
 
Markoz
CS Team
*
Offline


Posts: 12368
Location: Victoria, Australia
Joined: Apr 24th, 2009
Gender: Male
Re: 767: The Tutorial, A Work In Progress
Reply #4 - Sep 12th, 2009 at 2:22am
Print Post  
I hope this is the one you are talking about Tim.


Here is the link to DTOCalc that I found and downloaded.
http://mbev.net/lds767/ldsflyingclub/DTOCalc.zip

Mark
  

Mark Fletcher


PC: i7 10700K @3.8/5.1GHz | 64GB DDR4 3200 | 12GB RTX 4070 Super | 32" LCD Monitor | 1TB SSD & 2x2TB SSD | Win 11 Pro - FSX/FSX-SE/P3D3/P3D4/P3D5/P3D6/MSFS2020
15.6" Gaming Laptop: i7 7700HQ | 32GB DDR4 | 6GB GTX 1060 | 256GB SSD & 1TB HDD | Win 10 Pro 64bit - FSX-SE/P3D4
Back to top
 
IP Logged
 
Tim Capps
Senior Member
*
Offline


Defense Lawyer & US Navy
JAG (ret), Writer

Posts: 1070
Location: Southern Illinois
Joined: May 21st, 2009
Re: 767: The Tutorial, A Work In Progress
Reply #5 - Sep 12th, 2009 at 3:59am
Print Post  
yep, that's the one.  Glad you found the link.
  

PC: i9 10900K @ 3.8 GHz | 32GB DDR4 3200 | 10GB RTX 3080 | 32” Asus TUF VG32VQ Curved Monitor | Samsung 2TB SSD HD | Win 10 Pro 64 - Flight Sim P3Dv5.2 |
Back to top
 
IP Logged
 
Markoz
CS Team
*
Offline


Posts: 12368
Location: Victoria, Australia
Joined: Apr 24th, 2009
Gender: Male
Re: 767: The Tutorial, A Work In Progress
Reply #6 - Sep 12th, 2009 at 5:30am
Print Post  
No problems Tim. Glad I could be of some help.  Smiley

BTW. Love this post. A very thorough tutorial. Thanks.

Mark
  

Mark Fletcher


PC: i7 10700K @3.8/5.1GHz | 64GB DDR4 3200 | 12GB RTX 4070 Super | 32" LCD Monitor | 1TB SSD & 2x2TB SSD | Win 11 Pro - FSX/FSX-SE/P3D3/P3D4/P3D5/P3D6/MSFS2020
15.6" Gaming Laptop: i7 7700HQ | 32GB DDR4 | 6GB GTX 1060 | 256GB SSD & 1TB HDD | Win 10 Pro 64bit - FSX-SE/P3D4
Back to top
 
IP Logged
 
maximus92
Full Member
*
Offline


Posts: 23
Joined: Dec 30th, 2008
Re: 767: The Tutorial, A Work In Progress
Reply #7 - Feb 21st, 2010 at 11:17pm
Print Post  
I think this deserves a bump.  The only thing I would change, for realism sake, is that the pilot should only engage the fuel pumps for the engine he is starting.  

Typically engine two is first, so you would engage the right aft and fwd, and right center fuel pumps.  Engine ignition switch to 2.  Engine 2 start selector to GND.  Wait until N2 reaches 20%-23% then flip the right ENGINE FUEL CUT OFF.

When your numbers on the EICAS stabilizes, then repeat for engine one, engage left aft and fwd and left center fuel pumps.  Engine ignition switch to 1.  Engine 1 start selector to GND.  Wait until N2 reaches 20%-23% then flip the left ENGINE FUEL CUT OFF.
  

Back to top
 
IP Logged
 
Page Index Toggle Pages: 1
Send TopicPrint
 
  « Board Index ‹ Board  ^Top