Post by Tim Capps on Sep 6th, 2009 at 9:12am
NOTE: EVERYTHING THAT FOLLOWS IS A WORK IN PROGRESS AND SUBJECT TO SUGGESTIONS AND CORRECTIONS.
User Recommendation: Change Default Flight. Default Cessna, everything OFF (except for master avionics, since some airplanes don't model that) with parking brake ON. Field of your choice. Save flight as default, replacing the hang glider in FSX. Why? FSX "expects" some parameters that are best met with a default flight. Most add-ons will perform more reliably using this method. NOTE: This will give you a "cold and dark" start for all your airplanes. If you don't want to do this, then ignore this recommendation.
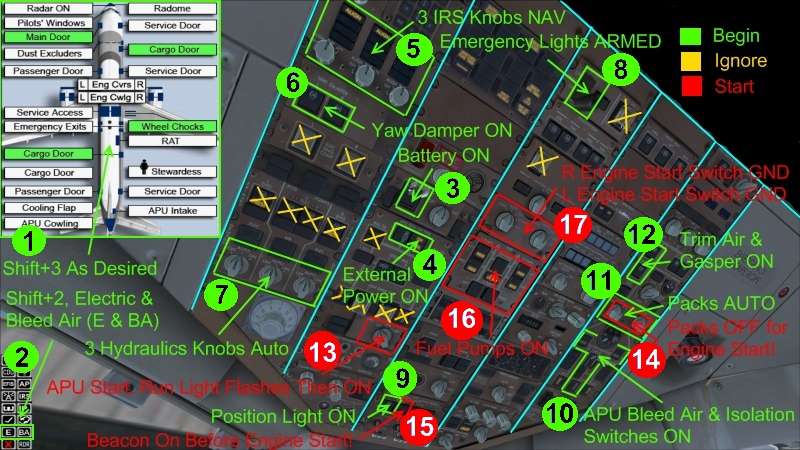
NOTE: The following looks complicated. Just like the airplane. But, like the airplane, it is not so bad once you learn how to focus on one area at a time. Note how I have divided up the panel with light blue lines. Key on the colors and numbers in the picture below, too. Develop a "flow" so you can deal with items in a natural and logical procession. These instructions will help you learn how to start your airplane. It is no substitute for studying the manuals, which really are well-done. Part III has an expanded checklist.
Everything may be accomplished from the virtual cockpit. Generally, the green steps should be performed in order, followed by the red steps when you wish to start.
"Ignore" items should be checked, but should be defaulted correctly. You do not want to be messing with the the electrical bus panel other than to turn External Power on or off. There are "don't touch" items that can't be fixed by the pilot, like deploying the RAT, or passenger oxygen masks, or disengaging the generators from the engines.
However, please make sure your overhead does look like this when you are done: the identified items should be as indicated BELOW (even if you have to push a button I have otherwise assumed should be okay and marked with an X):
GOTCHAS! ---> For engines to start, you must have FUEL PUMPS ON, PACKS OFF, APU running with RUN LIGHT ON, sufficient bleed air pressure. For IRS ALIGN TO STOP BLINKING you must be stationary and input your position as described in the FMC section below.
THE OVERHEAD
GREEN: Begin
1. Shift+3 for external animations as desired
2. Shift+2 for 2D icons, push E & BA for ground electric and bleed air (note, you can ignore this and start your APU once your battery is on, but this burns fuel and is less economical.)
3. Flip up battery cover & push ON
4. See "External Power Available" push ON
5. Turn 3 IRS knobs directly to NAV
6. Push Yaw Dampers ON
7. Turn 3 hydraulics knobs to AUTO
8. Open Cover, switch Emergency Lights to ARMED
9. Turn Position Lights ON
10. Push APU bleed air button On, push isolations switches ON, watch air pressure RISE
11. Turn Packs ON
12. Push Gasper and Trim Air ON, watch some lights go out
(Now program FMC, get clearance, etc. Button up, pull chocks, get ready for pushback.)
RED: Start Engines during pushback
13. Turn APU knob to START, it will spring back, watch RUN light flash, then hold steady (if not, you have a big problem: call maintenance. Also now Turn OFF external power and disconnect ground power and air -- your APU is running things.)
14. Turn Packs OFF, watch pressure rise on gauge below
15. Turn Red Beacon ON
16. Turn Fuel Pumps ON (even one that went out when APU started)
17. Start first the right engine, then the left, using the same procedure:
17(A). Turn R Engine Start Knob one click LEFT to GND
17(B). Watch R Engine indicators rise on upper EICAS (see below)
17(C). Flip UP R Fuel Lever below throttles, enjoy animation (see below)
17(D). Turn L Engine Start Knob one click LEFT to GND
17(E). Watch L Engine indicators rise on upper EICAS (see below)
17(F). Flip UP L Fuel Lever below throttles, enjoy animation (see below)
When both engines are running, you no longer need the APU. Make sure both the R & L bleed air buttons on either side of the APU bleed air button are ON. Turn APU OFF. (You may do this during taxi, or even after takeoff, but the APU is burning fuel.) Don't forget to turn your packs back on for your passengers' comfort.
PANEL AT TAKEOFF (although note red items from overhead discussion)
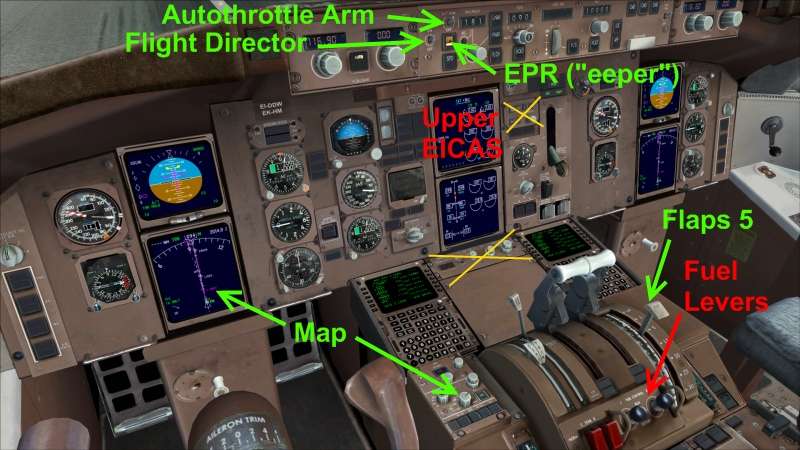
This shows where the Upper EICAS is and the fuel levers.
It also shows some other items related to takeoff. Note that the thrust-related controls are crossed out because it is not necessary to do anything to them. IF YOU WANT TO MAKE A DE-RATED TAKEOFF, you can set your assumed temperature on the FMC's Takeoff page. (You can use these other controls, but is a different option.)
You want to make sure your Flight Director is turned on. About the time your are turning onto the runway, arm your Autothrottle. When you are ready for takeoff, simply advance your throttles to about 1.40 EPR and then hit the EPR button (for P&W engines, like the Delta has). Autothrust will take it from there.
A note about TRIM: if you feel you are zooming up at too great an angle, try setting your trim closer to 1 than 3.


